Related Advancement and Awards
- Tenderfoot, Second Class, and First Class camping requirements
- Backpacking, Camping, Emergency Preparedness, Hiking, Safety, Search and Rescue, Skating, Snow Sports, and Wilderness Survival merit badges
 Staying Warm – In winter conditions, dressing correctly can do more than keep you comfortable—it can keep you alive. Dress in layers, so you can add or remove articles of clothing to regulate your temperature. And be sure to include layers that wick (absorb moisture), block the wind, and keep you warm.
- Wick—Your innermost (base) layer should be made of material that wicks, or draws, moisture away from your body.
- Wind—Your outermost layer should block the wind.
- Warm—Your middle layer or layers should trap the heat that your body generates.
Avoid cotton, especially in your base layer, because it will trap moisture and make you feel colder.
Wind Chill –Meteorologists use wind chill to describe the combined effect of cold and wind on the human body. Wind chill temperatures always are the same as or lower than the actual temperature, and decrease with higher winds. For example, when the temperature is 30 degrees, the wind chill is also 30 degrees if winds are nearly calm. The wind chill will drop to 17 degrees, however, if winds are blowing at 20 miles per hour.
The concept of wind chill was developed in part by Eagle Scout Paul Siple, who coined the term. Siple participated in two Antarctic expeditions with famed explorer Richard E. Byrd Jr. as a representative of Scouting America.
Snow Shelters – A snow cave provides terrific protection in the worst winter storms. The drawback is that it takes a good deal of time to construct. There are four main steps in building a snow cave:
- Choose the site.
- Tunnel in.
- Shape the cave.
- Add finishing touches.
Choosing the Site – Choose a spot that is free of any avalanche danger and that will provide a flat and stable base. Look for a drift or swale near ridges or trees. A cave with its entrance on the leeward side of a slope will offer additional protection from the wind. Form snow into a pile at least 5 or 6 feet high and 10 to 12 feet in diameter—large enough to accommodate the number of people to be sheltered.
Allow the snow to settle and bind together for strength and stability. Leave it alone for several hours before any digging is attempted. This binding time varies depending upon the type of snow, the moisture content, and the air temperature. In some conditions, such as dry, granular, or corn snow, more time may be required for the crystals to bond. If your group is large, it may be easier and more effective to build several smaller caves. In some cases the crystals may not bond at all and other types of shelters must be considered.

Preparing to Dig – Large scoop shovels are good for digging. Smaller avalanche shovels also work well. In an emergency situation where a shovel is not available, a small cooking pot, a snowshoe, a ski, or even a signal mirror will work. Use whatever you can, including your hands.
Tunneling In – In deep snow, start by digging a trench downward. As you dig, snow that is being removed to form the trench should be placed on the roof area of the cave. Make the trench as deep as you are tall. Then begin tunneling in. Form the entrance at about knee level and make the tunnel slightly wider than your body. If the terrain and snow depth allow, tunnel at a slight upward angle so that the end will be at least a foot higher than the entrance. Because the tunnel slants upward, rising warm air will not escape through it and heavier cold air will not seep in from the entrance.
If possible, make the tunnel the length of your body. At the upward end of the tunnel, hollow out a space as large as your body. Moving the snow then becomes a major task. Hold the shovel in front of your body to dig in. As you move forward, use your feet to move the snow into the tunnel and out of the entrance. Now you are ready to begin shaping the cave.
Shaping the Cave – The cave walls should be at least 12 inches thick to create a stable and well-insulated structure. Excavate a dome-shaped space at the top of the tunnel, judging the thickness of the roof by watching from the inside for a light blue color in the snow that indicates the wall thickness is about right. An elevated sleeping platform is important because it puts you close to the warmer air in the upper part of the cave. Initial shaping can be done with a shovel doing the bulk of the work; final shaping is best done with a gloved hand.
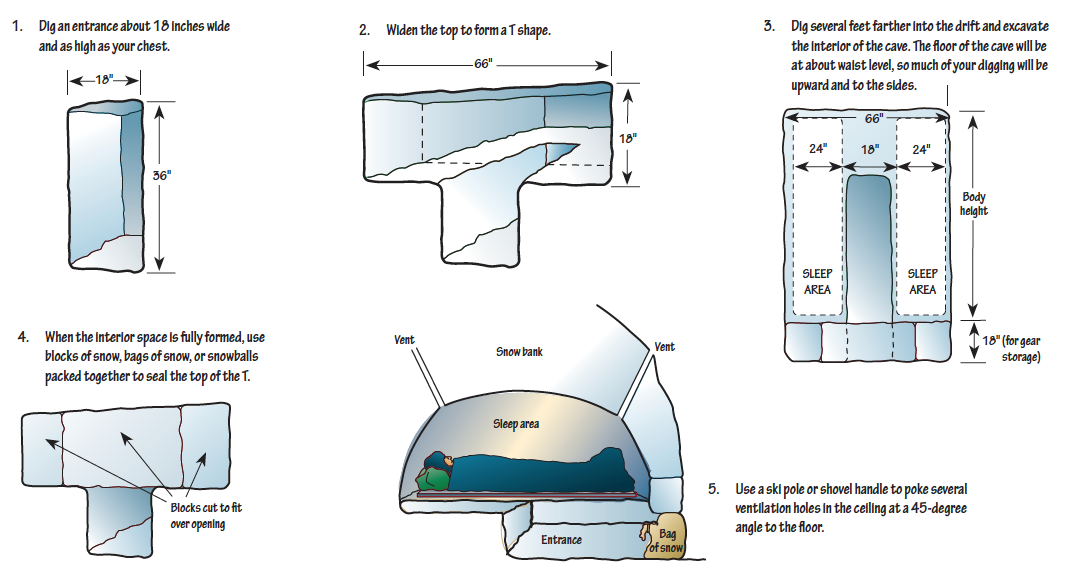
Adding Finishing Touches – Smooth the curved roof to remove sharp edges that may cause moisture to drip onto your gear as the temperature in the cave rises. Finally, use a ski pole, shovel handle, or stick to punch several ventilation holes in the ceiling at a 45-degree angle to the floor.
Leave this object handy to clear the holes at regular intervals if they become clogged. The ventilation will help to prevent carbon dioxide buildup from your own breath as well as carbon monoxide if you plan to use stoves or candles.
Make a shelf to hold a lighted candle, which can increase the air temperature in a small cave by 20 degrees or more. Other shelves and platforms can be created for gear and equipment. The entrance to the cave can be blocked with a snow block, pack, or other gear to further reduce air movement and increase the temperature inside.
Note: Be aware that collapses can sometimes occur during construction of a snow cave, especially in granular snow. It is best to build caves in teams of two and have one person remain outside to rescue the builder in case of collapse. Snow caves rarely collapse after construction because the colder temperatures at night tend to increase the overall strength of the shelter.

